This post is now deprecated, Please follow the more enhanced one: http://www.projectatomic.io/blog/2017/01/remote-access-docker-daemon
This post will describe how to use Docker daemon of Fedora Atomic host remotely. Note that we are also going to secure the Docker daemon since we are connecting via Network which we will be doing with TLS.
TLS (Transport Layer Security) provides communication security over computer network. We will create client cert and server cert to secure our Docker daemon. OpenSSL will be used to to create the cert keys for establishing TLS connection.
I am using Fedora Atomic host as remote and workstation as my present host.
Thanks to Chris Houseknecht for writing an Ansible role which creates all the certs required automatically, so that there is no need to issue openssl commands manually. Here is the Ansible role repository: https://github.com/ansible/role-secure-docker-daemon. Clone it to your present working host.
$ mkdir secure-docker-daemon
$ cd secure-docker-daemon
$ git clone https://github.com/ansible/role-secure-docker-daemon.git
$ touch ansible.cfg inventory secure-docker-daemon.yml
$ ls
ansible.cfg  inventory  role-secure-docker-daemon  secure-docker-daemon.yml

$ vim ansible.cfg
[defaults]
inventory=inventory
remote_user='USER_OF_ATOMIC_HOST'

$ vim inventory
[serveratomic]
'IP_OF_ATOMIC_HOST' ansible_ssh_private_key_file='PRIVATE_KEY_FILE'

$ vim secure-docker-daemon.yml
---
- name: Secure Docker daemon for Atomic host
  hosts: serveratomic
  gather_facts: no
  become: yes
  roles:
    - role: role-secure-docker-daemon
      dds_host: 'IP_OF_ATOMIC_HOST'
      dds_server_cert_path: /etc/docker
      dds_restart_docker: no
Replace ‘USER_OF_ATOMIC_HOST’ with the user of your Atomic host, ‘IP_OF_ATOMIC_HOST’ with the IP of your Atomic host, ‘PRIVATE_KEY_FILE’ with the ssh private key file of your workstation.
Now we will run the ansible playbook. This will create client and server certs on the Atomic host.
$ ansible-playbook secure-docker-daemon.yml
Now ssh to your Atomic host.
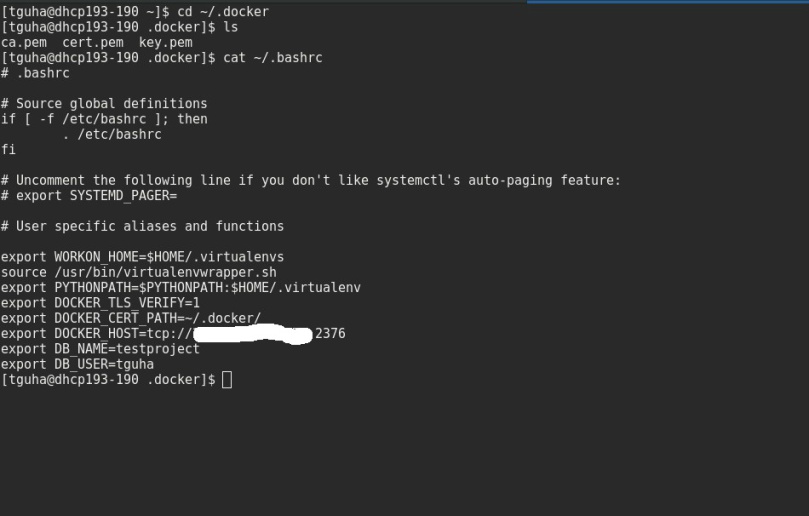
We will copy the client certs created on the Atomic host to the workstation. You will find the client certs file in ~/.docker directory as root user. Now create ~/.docker directory on your workstation for regular user and copy the client certs there. You can use scp to copy the cert files from Atomic host to Workstation or do it manually ;-).
We are going to append some Environment variables in the ~/.bashrc file of the workstation for regular user.
$ vim ~/.bashrc
export DOCKER_TLS_VERIFY=1
export DOCKER_CERT_PATH=~/.docker/
export DOCKER_HOST=tcp://IP_OF_ATOMIC_HOST:2376
Docker’s port is 2376 for TLS (secured port).
Now go your Atomic host. We will add tls options to docker command on atomic host.
Add –tlsverify –tlscacert=/etc/docker/ca.pem –tlscert=/etc/docker/server-cert.pem –tlskey=/etc/docker/server-key.pem -H=0.0.0.0:2376 -H=unix:///var/run/docker.sock in the /etc/sysconfig/docker file.
$ vi /etc/sysconfig/docker
OPTIONS='--selinux-enabled --log-driver=journald --tlsverify --tlscacert=/etc/docker/ca.pem --tlscert=/etc/docker/server-cert.pem --tlskey=/etc/docker/server-key.pem -H=0.0.0.0:2376 -H=unix:///var/run/docker.sock'
We will need to reload and restart the docker daemon.
$ sudo systemctl docker-reload
$ sudo systemctl restart docker.service
Reboot both of your Atomic host and Workstation.
So now if you try running any docker command as regular user on your workstation it will talk to the docker daemon of the Atomic host and execute the command there. You do not need to manually ssh and issue docker command on your Atomic host :-).
Here are some screenshots for demonstration:
Atomic Host:


Workstation: